To remove a Sharkbite fitting, simply use a Sharkbite disconnect tool to release the pipe. Twist and pull the fitting to remove it.
Now, let’s explore practical methods for removing Sharkbite fittings. Sharkbite fittings are commonly used in plumbing systems for their ease of installation and removal. However, circumstances may arise where you need to remove a Sharkbite fitting, whether it’s for repairs, replacements, or reconfiguring your plumbing layout.
Fortunately, removing a Sharkbite fitting is a straightforward process that can be accomplished with the right tools and techniques. In the following discussion, we’ll delve into effective methods for removing Sharkbite fittings, ensuring that you can successfully tackle this task when the need arises.
Sharkbite Fittings: An Overview
Brief Explanation Of Sharkbite Fittings
Sharkbite fittings are innovative push-to-connect plumbing fittings known for their ease of use and efficiency. Designed to provide a quick and reliable connection, these fittings eliminate the need for complex installation tools, such as soldering, gluing, or crimping. Their user-friendly design makes them a popular choice for both DIY enthusiasts and professional plumbers.
How They Are Commonly Used In Plumbing
Sharkbite fittings are commonly used in various plumbing applications, including repairs, remodels, and new installations. Their versatility allows them to be utilized with a wide range of pipe materials, such as copper, PEX, and CPVC, making them a go-to solution for connecting pipes in residential, commercial, and industrial settings.
Understanding The Removal Process
Understanding the Removal Process for Sharkbite Fittings is essential for anyone working with plumbing systems. These fittings are commonly used for quick and easy installation, but knowing how to remove them safely and effectively is equally important.
Importance Of Knowing How To Remove Sharkbite Fittings
Having the knowledge and skills to remove Sharkbite fittings is crucial in maintaining and repairing plumbing systems. Whether it’s for conducting repairs or making modifications, being able to disassemble these fittings without causing damage can save time, money, and ensure the integrity of the overall system.
Potential Issues That May Arise During Removal
When removing Sharkbite fittings, several potential issues may arise. These include difficulties in disengaging the fitting, risk of damaging the pipe, and the need to ensure a leak-free connection after reinstallation. Understanding these potential issues and how to address them is essential for a successful removal process.
Tools Required For Removal
If you need to remove a SharkBite fitting, having the right tools is essential for a successful extraction. The SharkBite fittings are designed for easy installation and adjustment, but when you need to remove one, the right tools and techniques are crucial. Here’s a breakdown of the tools required for a SharkBite fitting removal:
List Of Necessary Tools
Here’s a list of essential tools required for removing a SharkBite fitting:
- Adjustable wrench
- SharkBite disconnect clip
Explanation Of Their Purposes And How To Use Them
Here’s a brief explanation of the purposes of each tool and how to use them:
Adjustable wrench: The adjustable wrench is used to firmly grip the SharkBite fitting for stability during removal. Ensure that the wrench is appropriately sized to fit the fitting’s diameter.
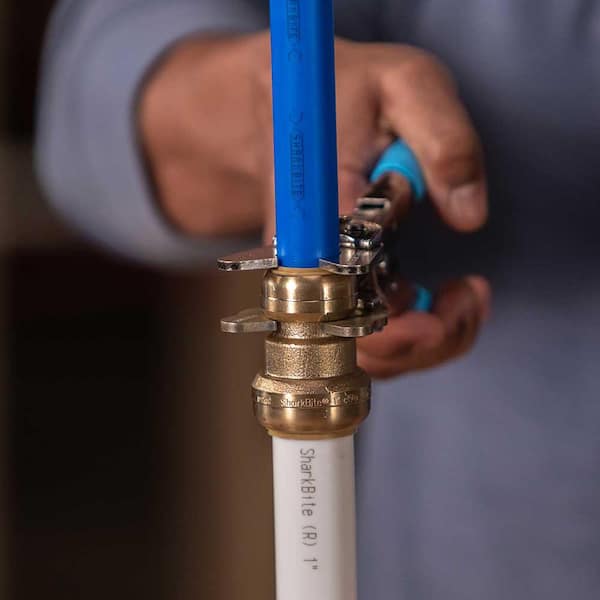
SharkBite disconnect clip: This specialized tool is designed to effortlessly release the SharkBite fitting from the pipe. Insert the disconnect clip into the fitting alongside the pipe, and then push the clip towards the fitting until it reaches the release collar. This action will allow the fitting to slide off the pipe, providing a secure and efficient removal process.
Step-by-step Removal Process
Welcome to our step-by-step guide on removing Sharkbite fittings. Whether you need to make repairs or upgrade your plumbing system, it’s essential to understand the proper process to remove these fittings without causing damage or leaks. In this post, we’ll cover the preparation and safety measures, as well as the detailed steps for removing Sharkbite fittings. Let’s get started!
Preparation And Safety Measures
Before you begin the removal process, it’s crucial to take the necessary precautions to ensure safety and a successful outcome. While Sharkbite fittings are designed for easy installation and removal, it’s still important to approach the task with care.
- Turn off the water supply: Locate the main shut-off valve and turn off the water supply to the area where the Sharkbite fitting is installed. This will prevent any water from flowing while you remove the fitting.
- Relieve pressure: Open faucets or fixtures connected to the plumbing line to relieve any remaining pressure within the system.
- Inspect the fitting: Before removal, visually inspect the Sharkbite fitting to ensure there are no signs of damage or wear that may complicate the removal process.
- Gather necessary tools: You will need a Sharkbite disconnect tool or a pair of adjustable pliers to safely remove the fitting without causing damage.
Detailed Steps For Removing Sharkbite Fittings
Now that you’ve taken the necessary precautions, it’s time to proceed with the removal process. Follow these detailed steps to safely remove a Sharkbite fitting:
- Use the Sharkbite disconnect tool: If you have a Sharkbite disconnect tool, insert it into the fitting and push it towards the release collar. This will release the grip on the pipe, allowing you to pull the fitting off.
- Alternative method with adjustable pliers: If you don’t have a disconnect tool, you can use adjustable pliers to grip the release collar on the Sharkbite fitting. Gently squeeze the collar to release the grip on the pipe, then pull the fitting off.
- Inspect the pipe: After removing the Sharkbite fitting, inspect the pipe to ensure there are no signs of damage. Clean and deburr the pipe if necessary before installing a new fitting.
- Install a new fitting (optional): If you’re removing the Sharkbite fitting for repairs or modifications, this may be the time to install a new fitting. Follow the manufacturer’s instructions for proper installation.
Tips For Easy Removal
Removing a Sharkbite fitting may seem daunting, but with the right techniques, it can be a hassle-free process. The following tips will guide you through the removal process, ensuring a smooth and efficient outcome.
Additional Tips And Tricks For Smoother Removal
When it comes to removing Sharkbite fittings, some additional tips and tricks can make the process even smoother. Consider the following:
- Apply heat: Using a heat source, such as a heat gun or blowtorch, on the brass sleeve can help loosen the fitting for easier removal.
- Use a disconnect clip: Sharkbite offers a disconnect clip that can be used to release the fitting from the pipe, providing a convenient and efficient removal method.
- Rotate while pulling: When removing the fitting, gently rotate it while pulling to help disengage the teeth from the pipe, making it easier to pull off.
Common Mistakes To Avoid During The Removal Process
During the removal of Sharkbite fittings, it’s important to be aware of common mistakes that can hinder the process. Avoid the following missteps for a successful removal:
- Using excessive force: Applying too much force when trying to remove the fitting can damage the pipe and make the removal more difficult.
- Skipping proper preparation: Failing to properly prepare the fitting for removal, such as not ensuring the pipe is clean and free of debris, can lead to complications.
- Not following manufacturer guidelines: Ignoring the manufacturer’s recommended removal methods can result in unnecessary challenges and potential damage to the fitting and pipe.

Credit: www.amazon.com
Frequently Asked Questions Of How Do You Remove A Sharkbite Fitting
How Do You Disconnect A Sharkbite Fitting Without A Tool?
To remove a SharkBite fitting without a tool, simply push the release collar against the fitting and pull the pipe out. It’s a quick and easy process that doesn’t require any special tools.
Can You Reuse Sharkbite Fittings?
Yes, SharkBite fittings are designed for easy removal and reuse. Simply use the SharkBite Disconnect Tongs to release the fitting from the pipe, and then it can be reused for another connection.
What Is The Best Way To Remove A Sharkbite Fitting?
The best way to remove a SharkBite fitting is by using the SharkBite Disconnect Tongs. Place the tongs over the fitting and squeeze the handles to release the connection, allowing you to remove the fitting easily.
Are Sharkbite Fittings Reliable For Easy Removal?
SharkBite fittings are known for their reliability and ease of removal. With the proper tools, such as the Disconnect Tongs, these fittings can be easily removed without damaging the pipes or fittings themselves.
Conclusion
Removing a SharkBite fitting is a simple process that requires a few basic steps. By using the appropriate tools and following the right methods, you can effectively remove the fitting without causing damage. This allows for easy repair or replacement, saving time and effort in the long run.
With these techniques, tackling SharkBite fittings becomes a hassle-free task for any DIY enthusiast.